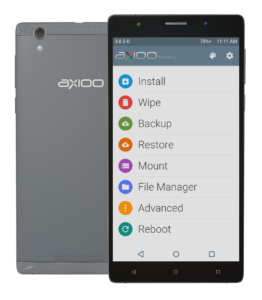
 Axioo M5C is using mt6580 chipset which had 5inch screen size with 720×1280 resolution. This is TWRP recovery for this model, hope this would be useful for you to do backups, install custom roms or only injecting supersu for root.
Download : recovery-twrp-m5c-3.0.2.0.img
md5 : 64f7078b45c087ab6e2bae94953781ad
14Nov16 :
looks like there is a mis-software on the axioo side with the latest shipment of this m5c device. I took down the recovery until I’ve got the device to borrow and create a new one. Please wait a couple of days, and sorry for the inconvenience.
UPDATE 17 Nov 2016 :
Download : recovery-twrp-m5c_final-3.0.2.0.img
MD5 : c720d4d2b617f44c7ceccb45023e04fb
Changelog :
- new lcd driver for latest batch shipment (compatible with the old one)
HOW TO INSTALL :
To install this custom recovery, you need SPFlashTool program which only available on winblows os platform so … really sorry, I cannot support it because I never use and don’t have winblows. You may refer to this tutorial : MT65xx Flashing Tutorial it is very well explained by Bruno Martin.
Please be really careful using SPFlashTool, especially when flashing ROM not for your device, since it may bricked your device forever.
Scatter file you might need : M5C_MT6580_Android_scatter.txt.rar
Of course you also can flash this custom recovery using linux or specific apk such as mobileuncle tool or recovery tool, but that’s another story.
HOW TO ENTER CUSTOM RECOVERY :
Using button combination to enter the custom recovery mode on this model is really pain in the ass. I don’t know why, usually it’s easy on any mediatek platform, just like these : First, completely power off the device until you feel the device vibrate, indicating it was totally shutdown. Then, hold down Volume Up button then press Power button, hold them both until you see 3 menu list appear, Recovery, Fastboot and Normal. Scroll or choose between item using Vol up button and select them using Vol down button. On this case, choose Recovery and press Vol down button, wait a sec or two … then you’ll be entering recovery mode.
The problem on this model is the timing, somehow it’s different than any other mtk model I’ve known, sometimes the button combination keypress just works okay just like that, sometimes not, be patient and I can assure you, it’s all about timing.
There are also many apk on playstore such as Quickboot, RecoveryTool, … etc, that can do reboot into recovery directly from alive system, but if this is your first time injecting twrp recovery, it’s a must since you’re not yet rooted. Read also my special note on this bottom of this article the reason why.
HOW TO ROOT :
After installing this custom recovery, you can install root and Superuser manually as usual, I recommend to use latest chainfire SuperSU. If you want to use my custom rom then you not need to flash this root manually, it’s already included on my custom rom.
Special NOTE for newbie :
If you came from stockrom and this is your first attempt to flash custom recovery, the sequence is mandatory. Please pay attention that after flash this recovery using spflashtool, you have to immediately enter the twrp recovery, DO NOT let the device boot into android os !! Why? Because if you let the device to boot into the system, the system will replace the twrp with the stock recovery again as part of their hacking attempt protection. This is common on any mediatek platform (if not all), so don’t be afraid, this is a well known protection issue.
I can understand the difficulties entering the recovery using button combination like I already mentioned above, but I cannot make this process easier and this is a must to do. If you’re by accident forgot that, is okay, just flash it again and directly enter the twrp recovery after it. Once you enter the twrp, you can install supersu or my customrom and it will have automated script that will disable that protection once and for all and the twrp will stick forever.
Happy flashing !


